
The sanitation of a rose garden is perhaps an important moment for the evolution of the plant. This is the time when we are pulling out the parts that might be damaging it to allow it to develop properly and therefore grow stronger. If, for whatever reason, no action is taken to withdraw these parts, it may be harmful and may lead to a possible deterioration of our exemplar.
The time when we must be alert to carry out this sanitation is the time when the rose begins to flourish. That is, from spring to late summer, which is usually when they stop making roses. If it is the case that a rose garden you have at home makes a flower in winter, you must do the same as if it were in summer (note that in winter they have to be kept in maintenance). This type of pruning is much easier than the pruning that is made with cold, as it simply consists of removing roses that have already dried. Below is this procedure and you can see a clear example with these two photo

In the photo on the left, you can see that there are two roses that if you use and look at you can see that there are brown dots that are the remains of the rose, that is what is left when all the petals have fallen (to understand us, it is the container that remains where the seeds are inside). However, in the photo on the right, these little vessels are no longer there. To let your roses to look the same as these two and to offer you roses until the end of the season, please note what I’m going to tell you now.
– First: you have to locate the parts to be withdrawn. They are easy to see because, as I told you before, they have a brownish coloration and are clearly seen with the green contrast of the leaves.
-Second: Once you have found them, try to have an empty bucket by hand to leave the remains. Take the pruning scissors, which you have to make sure they are sharp to make a cut as clean as possible and last but not least, if you want to avoid punching, grab some garden gloves to avoid accidents.
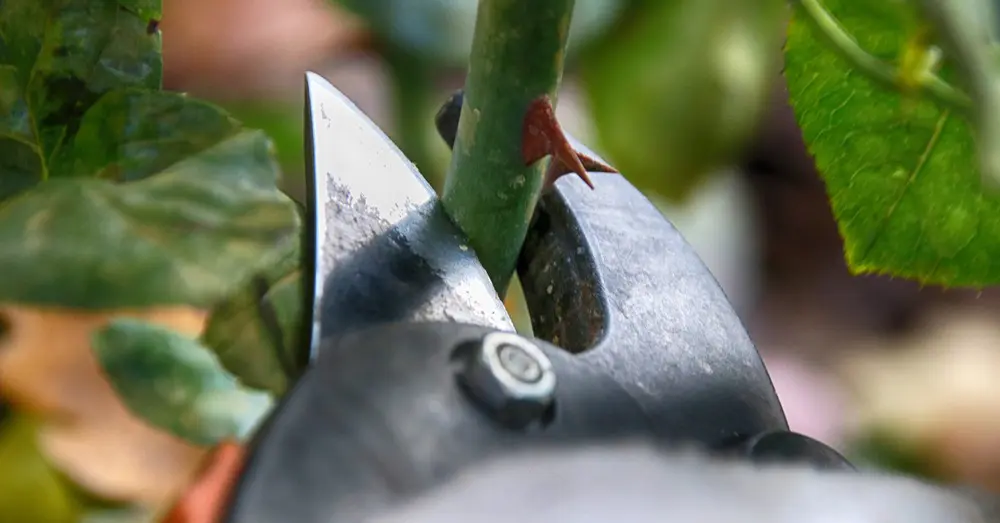
-Third: if you already have all the material, you can start pruning now. Take the rose at the tip and look carefully at the trunk, slow down until you see where the leaves begin. You have to cut just below the second or third leaf stretch, so, if you decide to cut from the second leaf start, it means you have to cut just above the third leaf. You must make a clean cut (hence the importance of having a sharp tool) of about forty-five degrees, because we will prevent water from accumulating if it rains and prevent possible diseases. Now, you just have to repeat the same thing all over the rose garden until you leave it as clean as possible, if you see that there are any dry blades, you can also take advantage of it and remove it.
As I told you, it’s a very easy piece of work, it won’t take you much work and it won’t take you much time. I made these two that you see, and the smaller one next to that, I’ve taken about ten minutes. When a while has gone by, you’ll see that it reappears where you’ve been cut, and so this will be new roses.
Finally, I’ll show you a picture of how the cut should look if you’ve done everything I’ve explained before. Don’t worry if you don’t feel well the first times you do it, you’ll be getting better with practice.
